
How To Prepare For An Architectural Photography Shoot

Proper Scouting is essential to a successful shoot. I knew weeks in advance of our production day that the marble counter would require warm directional lighting to bring out its details, and that I would need a significant amount of extra time to properly block out the numerous distracting reflections on the tile floor.
Apologies for the length of this guide, but the details matter. Download the PDF here if you prefer to read it on the go and have it available offline.
Adjust Your Mindset
Hello Architects:
I know you. You’re like me. It’s why I get along with so many of you. Though our crafts differ, we share the same obsessive dedication to our work and want nothing more than to focus without distraction.
You spend years immersed in your designs, dealing with zoning, regulations, supply shortages, construction delays, acts of god, and red tape, draining your own essence to bring your vision to life. When it’s done, you collapse with rapture. You’re proud, relieved, and exhausted. You go from pulling all-nighters fueled with passion and adrenaline to struggling to take the garbage out.
The tank is empty.
But the work isn’t done. Now that you’ve created your thing - your grand design, luxury penthouse, historic restoration, film, painting, photo series, book, etc.- it needs to be seen by the right audience. Your inspired portfolio can’t maximize its value if it isn’t properly documented and photographed for your marketing funnel, including new commissions, award submissions, and, yes, the Instagram flex.
I get it. You’re ready to move on. The work is what matters. I feel the same about my own projects. I want to create, and I resent having to build the structure to promote it.
But we don’t live in fantasy Powerball land. We’re entrepreneurs. We have to promote ourselves.
Most people will never see your design in person. They won’t walk through your lobbies or drive by your homes. The photos you commission will be their only encounter with them. Those images become the public record of your work for awards, press, portfolios, RFPs, and the next client deciding whether to hire you or your competition.
So now is not the time for half-measures.
You’ve commissioned a photo shoot. Great start.
Now, I’m going to keep your hands on the wheel, whether you’re working with me or another architectural photographer who’s earned your business.
Here is your comprehensive, no-nonsense, no-stone-left-unturned checklist to prepare for a successful architectural photoshoot.
Align the vision:
Define success first. Who are we speaking to, where will the images reside, and what outcome proves that the shoot was successful? With that nailed, I can shape the look and the shot plan that moves the needle. I am not in the business of creating pretty pictures. I am in the results business. The camera is the tool. Our north star is simple: Does this frame advance the goal?
“Every picture tells a story, don’t it?” - Rod Stewart
What is the story of your project? What is its purpose and grand idea? How does one room lead to the next, or create divergent paths for different users? Are we leaning somber or playful, restrained or bespoke? Do we want dramatic moods and crisp shadows, or soft, painterly light and gentle hues that complement smoother design elements?
What was your intention? What did you struggle with? Which problems did the design solve, and which features prove it? What is the building’s function—a skatepark that pulls a community together, a children’s courthouse preserving hope, a woodland retreat that nurtures creativity?
My pre-production process turns these answers into a concise narrative that sets the “look.” Then we translate that story into a shot plan, including sequence, time of day, mood, key details, and whether people appear in the frame.
Build a simple shot plan:
Nobody knows the space better than you. You see every texture and corridor, and you have watched how the sun shapes the rooms throughout the day. Your photographer brings fresh eyes, suggests compositions, decides what to include or exclude, and handles the technical work to capture the shot. They can also point to angles and styles that have delivered results for similar clients.
However, they will never know the project as well as you do, and having a short list of starter angles helps everyone get aligned faster. I always marvel at the details my clients discuss among themselves when we’re on scouts. Even after more than ten years in this job, they can point out dozens of details I’d never notice.
Before you reach out, gather:
10–15 must-have angles that tell the story of the space. These are a starting point. We will discover new ones on the scout and even on the shoot day.
Sun priorities and any required twilight views. Which shots look REALLY good at sunrise/ sunset? What, if any, areas can be enhanced by the ambience of dusk?
People or no people, and how present they should feel. Do we want them tiny in the frame to create a sense of scale? Or do we want to feature them prominently within it?
References to establish tone, pacing, and polish, even if it is your own prior work.
What are we translating?: scale, negative space, materials and textures, views, color harmonies, functions, engineering elements, lighting design, and how natural light is guided. What are you most proud of? What makes it apart?
Decide who decides:
Choose one “day-of” decision maker to approve angles and give the green light. This helps expedite the photoshoot and avoid the stagnation that comes with having “too many cooks in the kitchen.” This person will be responsible for coordinating with the photographer on creative decisions and providing the majority of feedback during the post-production revision rounds. You’ll likely have multiple hands on deck, especially if it’s a larger photoshoot, but it is best to assign one person as the creative liaison. This person can filter everyone’s feedback into a clean, streamlined communication funnel with your photography team.
Speaking from experience, things can get muddy when everyone is talking over one another to share feedback, criticisms, and ideas. Often, people unintentionally end up contradicting each other, which can result in additional time spent on set or hours of retouching when everyone’s suggestions are being considered. It can also be confusing for the photographer when they’re not sure who has the final say.
Figure out your intended usage:
Where will the images live? Collateral items like your website, social media, presentations, and marketing materials? Editorial placements? Paid advertising or out-of-home? Do any partners need access?
I have a more comprehensive licensing guide if you’re interested, but the point is simple: when we define usage, I can draft the right contract that expressly grants the rights you need and price the scope accordingly. Clear usage also drives creative decisions (aspect ratios, people in frame, retouching level) and helps set a realistic budget.
And on that note….
Establish Your Budget
It is okay if you don’t have an exact number yet. A ballpark range lets everyone plan honestly.
Set the budget early so wish lists become an actual plan. It sets expectations and gives us guardrails to allocate time, crew, and retouching where they matter.
Share a budget upfront, and the negotiation stops feeling like a game of poker. No OK Corral standoffs, no guessing games. It lowers the temperature, sets clear expectations, and allows us to design a plan that aligns with your goals. Your budget is not a pair of aces to clutch to your chest; it is a tool. When a photographer asks for it, the aim is not to squeeze every dollar. It is to map what is realistic, help you prioritize, and flag where we can MacGyver smart fixes so more of the spend lands where it matters.
With real numbers on the table, your photographer can also identify redundancies and make informed cuts. Maybe a second twilight duplicates coverage, a drone adds little in a tight urban canyon, or three lobby shots add bloat when you will realistically use one. Maybe you need 15 images instead of 25, and can redirect funds to a stylist. It is in everyone’s interest to negotiate with transparency.
If you only have a range, I will typically present three options: a bare-bones option that meets the minimum goals, a mid-tier option that expands coverage or adds key crew members, and an all-out option that includes more images, motion add-ons, or a digital technician to ensure smooth capture.
Most importantly, a defined budget frees the creative to serve the goal. We spend time where it matters, capture the right angles, and deliver press-ready files without drama, reshoots, or surprises.
Consider Your Partners & Vendors:
Architecture is a collaborative art. I don’t need to tell you this. A building is the result of multiple teams of people combining their specialities. That means more than one party can benefit from the images: the architect, interiors, developer, GC, structural and MEP engineers, landscape architect, lighting designer/technician, fabricators, and key product manufacturers.
Many photographers (me included) offer cost-sharing so multiple stakeholders can license the same shoot at a lower per-party cost than licensing after the fact or commissioning separate shoots.
How cost-share usually works
Each additional party purchases an add-on license, typically at a rate of 20–30% of the creative fee.
The total is split among participants, so everyone pays less per party.
Each party receives its own license agreement with allowed uses (web, social, PR, print collateral; paid ads only if specified).
Credits are agreed up front so press and partners can caption accurately.
Quick example
Creative Fees (production, post production, drone, video, etc): $8,000 (lead client license included)
Add-on licenses: $1,600 each (20%) for three partners = $4,800
Total: $12,800 → $3,200 per party for four licensed stakeholders.
See the potential for SIGNIFICANT SAVINGS?
My Ground Rules For Cost-Sharing
One-day decision maker for creative.
One consolidated feedback round from all parties.
Clear usage per party; no reselling or sharing files downstream.
Credit line agreed in writing.
One party is responsible for paying the full invoice and collecting the shares of everyone else on their end.

Tethering provides reassurance that we’re getting everything right in the camera. It allows us to make adjustments on the fly and evaluate full resolution previews in real time.
Choosing Your Photographer
Architectural photography is a spectrum. Some photographers carry a wide slate of work across building types. I am one of them. I have photographed museums, high-rises, shopping malls, luxury condos, and cruise ships. Others focus on a single niche, such as interior design or hospitality. Neither path is better by default. The right choice is the one that matches your goals, timeline, and audience.
Before you look at portfolios, revisit:
Primary use and intent. Awards, press, website, leasing, investor decks.
Constraints. Construction access, occupied spaces, tight load-in, union sites, security rules.
Logistics. Need a drone or a helicopter? Choose vendors who can legally fly (Part 107) or coordinate aviation. International project? Decide local hire vs fly-in. Construction photos? Look for photographers who have experience being on construction sites.
Aesthetic target. Clean and clinical, warm and lived-in, editorial grit, or high-polish hospitality. Who is the audience: editors or investors?
People. Decide whether people appear and how present they should feel.
Style fit is everything.
One of the most common pain points is creative mismatch. Clients often prioritize availability, rate, or convenience and assume photographers are a monolithic commodity. While pros can adapt, each of us is strongest in a specific visual language: how we treat color, manage mixed light, and shape mood. If you want a particular aesthetic, hire someone who already shows it in their portfolio. Do not book a photographer known for clean, sterile imagery if you wish to create an editorial, lived-in feel, and vice versa.
Generalist or specialist?
Pick a specialist when the brief is narrow and nuanced (e.g., hospitality interiors with complex styling). Choose a generalist with a broad scope of coverage when you need a consistent look across exteriors, interiors, amenities, lifestyle elements, video, and aerials.
Local or fly-in?
Local talent can simplify access and reduce travel costs. They have connections and crew they can lean on and their finger on the pulse of how things work in that city. A fly-in may be worth it for a specific style or trusted process, but it will add travel expenses to the scope. It becomes more complicated if the project is international, as many countries require carnets to enter with thousands of dollars’ worth of production equipment.
What to look for in an architectural photographer’s portfolio:
Do a quick audit. In 5-10 minutes, you should see:
Straight verticals with no leaning walls.
Clean colors and Intentional color casts: no green casts from mixed lighting sources that are all over the place. If people are in the shots, their skin tones should appear natural. Blue daylight from one side of the image and warm tones from tungsten sources can create a “messy” sludge of color.
But on that note, experienced and high-level photographers will intentionally lean into the proper use of color and selectively emphasize specific sources of it without it looking messy. This is known as motivated lighting. For example, a room with blue RGB fixtures should have a slight blue spill throughout, and if someone is sitting under that lamp, it should reflect on them as well, with respective cooler tones. A room with wood fixtures might realistically leave some warmer tones on the white ceiling.
Surface Control: reflections and glare are managed, resulting in clear, unobstructed windows. I understand that blown-out windows can be an aesthetic choice. But there’s a right way to do it. They shouldn’t be blooming with harsh transitions. They should be soft. Reflections are something many amateur photographers tend to overlook, and it is reflected (no pun intended) in final images that contain unsightly and distracting glare and reflections. A little is okay if meant to lean into a more “realistic” or “editorial” look, but a discerning eye is needed to ensure the final image isn’t too far gone.
Edge of the frame: furniture legs not cut, no lens warping/distortion, no halo-ing from overcooked HDR images or weird artifacts from poor masking/ cutouts
Story variety: Wide, medium, detailed,close-ups, and moments that explain the design
Your building type: At least a few projects like yours at a comparable level. So if you’ve designed a hotel, you’ll want to hire a photographer with at least some experience shooting them. Don’t hire a photographer who only shoots residential interiors.
Twilight balance: Exterior ambient light should be enough to provide some exposure while balancing with interior practicals, while keeping the sky properly exposed.
Exteriors should be shot at an appropriate time of day with intentional use of light. Some buildings look great with hard directional light, while others benefit more from softer, diffused light at sunrise/sunset, and still others might look great with even softer backlight or even as a silhouette. Whatever the light: it should be adequately balanced and appropriate for the design.
Complete project sets you can view, not just highlights. Anyone can get lucky and generate (or prompt) some great images if they shoot enough. You want to ensure that the photographer is capable of producing a consistent body of work for a project that conveys a narrative arc and effectively represents the various design elements.

Good assistants are worth their weight in any currency. Photographers who insist on working alone are inviting more stress than necessary. I’ve taken mine all over the world from Italy to Iceland.
Questions to ask on the first call:
These will help you cut through the BS and separate the pros from the posers.
What kind of usage does your standard licensing agreement allow for? How can we get third parties involved if desired?
Do you recommend people in frame for this project? If so, how will you manage wardrobe and movement?
How should we prep in advance?
What are typical deliverables? How many shots can we expect in a day?
What is your backup plan for weather or access issues, and how do reschedules work?
What is included in post-production and retouching, and what counts as “advanced retouching? This is critical if you already know that your project might require some post-production work, as not all photographers possess the advanced Photoshop skills necessary for specific edits. Therefore, it’s essential to determine if they can integrate it into their workflow, if they outsource it, or if they’re capable of doing it and have examples of the work they can produce.
Crew: Who is on set? Who moves furniture? Do you work with a stylist? (if necessary)
Drone Compliance. Verify that they have a Part 107 license from the FAA and have an understanding of local drone laws, airspace, and specialty permissions. Trust me, you don’t want to deal with the headaches and potential fines that come when an unlicensed pilot has an accident or causes damage to property or humans.
What is your typical workflow like? Are you using artificial lighting or relying on the sun's path to dictate your shot list?
Tell me about any specific obstacles or challenges you’ve encountered on shoots. How did you react/respond? These questions will help you gauge if this is a photographer who can think on their feet or if they panic when things go sideways.
What, if any, tethering options do you offer for client approval?
You should be skeptical of any photographer who relies solely on the camera's LCD screen. Yes, for some shots, it is necessary, especially if you’re set up in an awkward spot or on a lift, or if it’s a spur-of-the-moment, inspired idea. However, for at least 80% of the shot list, I am either tethering to a laptop or wirelessly to an iPad. It’s a significantly better way to process what’s going on in a scene and get a feel for all the details and variables that need to be adjusted.
Licensing Made Simple:
If the photographer offers an estimate, make sure it clearly states the licensing and usage terms. Clear licensing now prevents awkward conversations later and keeps your assets working everywhere you need them.
Who can use the images and the procedures for expanding that, if necessary
Where and how: Web, social, print, PR, awards, Out of Home Advertising (if needed). Getting a firm grip on what you can do with the images now will save you from awkward conversations later.
Attribution: agreed project credits for press
How To Compare Proposals
You did the homework. You reached out to photographers whose portfolios inspire you, and now you have estimates.
Now what?
Sometimes it is as simple as chemistry. If you are going to spend long days together, liking the person matters. The “who would you rather have a beer with” test is real.
Still, look at more than vibes. I have heard too many stories from prospective clients who chose on convenience or price and then had to find the budget for a reshoot. Do not pick the cheapest option reflexively. “Buy once, cry once” exists for a reason. Rock-bottom rates often signal inexperience or a lack of contingency planning.
Experienced photographers charge what they charge because the work creates return: fewer headaches, better images, and a process that holds up when plans change. I am not the cheapest. My rates reflect the ability to pivot when the day throws a curveball, a clean workflow that keeps you out of email hell, post-production miracles when needed, and images that generate results.
Look past the bottom line. Compare:
Pre-production depth. Sun study, shot plan, scout, styling notes, schedule, contingencies.
Time on site. Realistic hours or days to chase light and dress sets.
Crew. Assistant, digital tech, stylist, and drone pilot (if needed).
Retouching. Level included, number of fully finished finals, and turnaround times.
Deliverables. File count, resolutions, color space, press crops, caption sheet.
Licensing. Who can use the images and where? Third-party add-ons are spelled out.
Service. Responsiveness, one decision-maker flow, review tools (for example, Frame.io for pinned image notes).
Logistics and safety: COI, site rules, data backups, Part 107 for aerial operations, and weather plan.
Payment terms. Clear schedule, hold date policy, and reschedule fees.
Red flags:
I am going to save you the trouble of weeding out the photographers who will give you nothing but headaches.
Vague deliverables or “all rights forever” bundled at a low fee.
No assistant for a heavy day that clearly needs one.
“We’ll figure it out day.” = Relies on winging it instead of planning.
No reschedule/weather policy. Can’t explain holds, rain plans, or fees.
No review workflow. No straightforward process for proofs, deadlines, or collecting consolidated feedback. They’re likely unorganized and not as efficient as they could be.
No contract or COI. Can’t provide a written estimate, license terms, or certificate of insurance on request. Contracts exist to protect all parties involved.
Gear talk > process talk. Brags about cameras and the gear they use, but struggles to comprehend or express an aesthetic language or point of view. You want someone who shows interest in developing a story that will move your audience.
“We’ll fix it in post.” As a catch-all, instead of solving issues with prep, styling, or timing. Look, I get it; sometimes it is easier to deal with something in Photoshop, especially given how far the software has come these days. I am certainly known for the challenging post-production tasks I tackle. But I’ll be the first to say it is not my preferred method. I always try to get it right in camera, if possible, because nine times out of ten, it looks better and is way more efficient. Photographers who rely exclusively on post-production to save their butts will eventually be at a loss when they lack the on-site problem-solving skills to handle things that can’t be fixed in post.

This is one of my personal favorite shots, and it was a total accident. The neighbor’s lab chased a flock of peacocks on the roof. I dashed to my car, grabbed my large tripod, set up my wireless tether, and popped off some shots just in time for the peacocks to walk into the frame. It was only possible because I was way ahead of schedule on my shot list and could afford to play and experiment. Had I been less prepared, I might not have even noticed my surroundings. I’d have been too focused and stressed trying to get through my shot list.
Preparing For The Shoot
Ok, so you’ve selected your photographer, paid your deposit, and scheduled your production days.
We can just show up and shoot, right? Not too fast. Pump the brakes there. We’ve only just started the preparations.
A Scout Day is Non-negotiable…
You will thank me later. I have been on shoots without a scout, and there is nothing worse than burning beautiful light because we spent the first two hours sprinting through the property to find angles.
A proper scout lets us anticipate problems and solve them in advance. We hit the ground running because we already know where the camera will be positioned, what lighting is required, and where the sun will be at any given time.
The best part: preparation creates ripe conditions for happy accidents and hidden gems that often become everyone’s favorite shots. When the set is quiet and the plan is clear, you tend to move a lot faster, which leaves plenty of gaps in the schedule that can be filled with improvising, experimenting, and seeing the property with a fresh perspective.
What we confirm on a scout
Hero angles
tracking the sun's location throughout the day, relative to the angles required for shooting. Here, we determine whether to rely on natural light or use flashes.
Reflections, view plates, and glare control
Bulb color temperatures and any swaps needed
Styling needs and what to remove or add
Load-in route, staging room, power, and quiet hours
Access quirks: elevator keys, security posts, restricted areas
Safety and compliance: PPE, permits, drone windows if relevant
Weather contingencies and a hold date
Scout deliverables you should expect
One-page schedule with time blocks for each hero
reference images with annotations and notes
Priority list: must-have, nice-to-have, detail targets
Gear notes: lifts, flags, polarizers, spare bulbs, ND gels
Prep list for the client team
A scout is not just about picking angles. It is also about reassessing the scope. Perhaps you need fewer kitchen variations and more detailed information. Maybe the best hero is from the neighboring rooftop, which means securing access now rather than improvising later. The scout provides your photographer with the necessary information to create a schedule and game plan to share with your team.
It also shows you exactly how to prepare the space, which is where we are headed next.
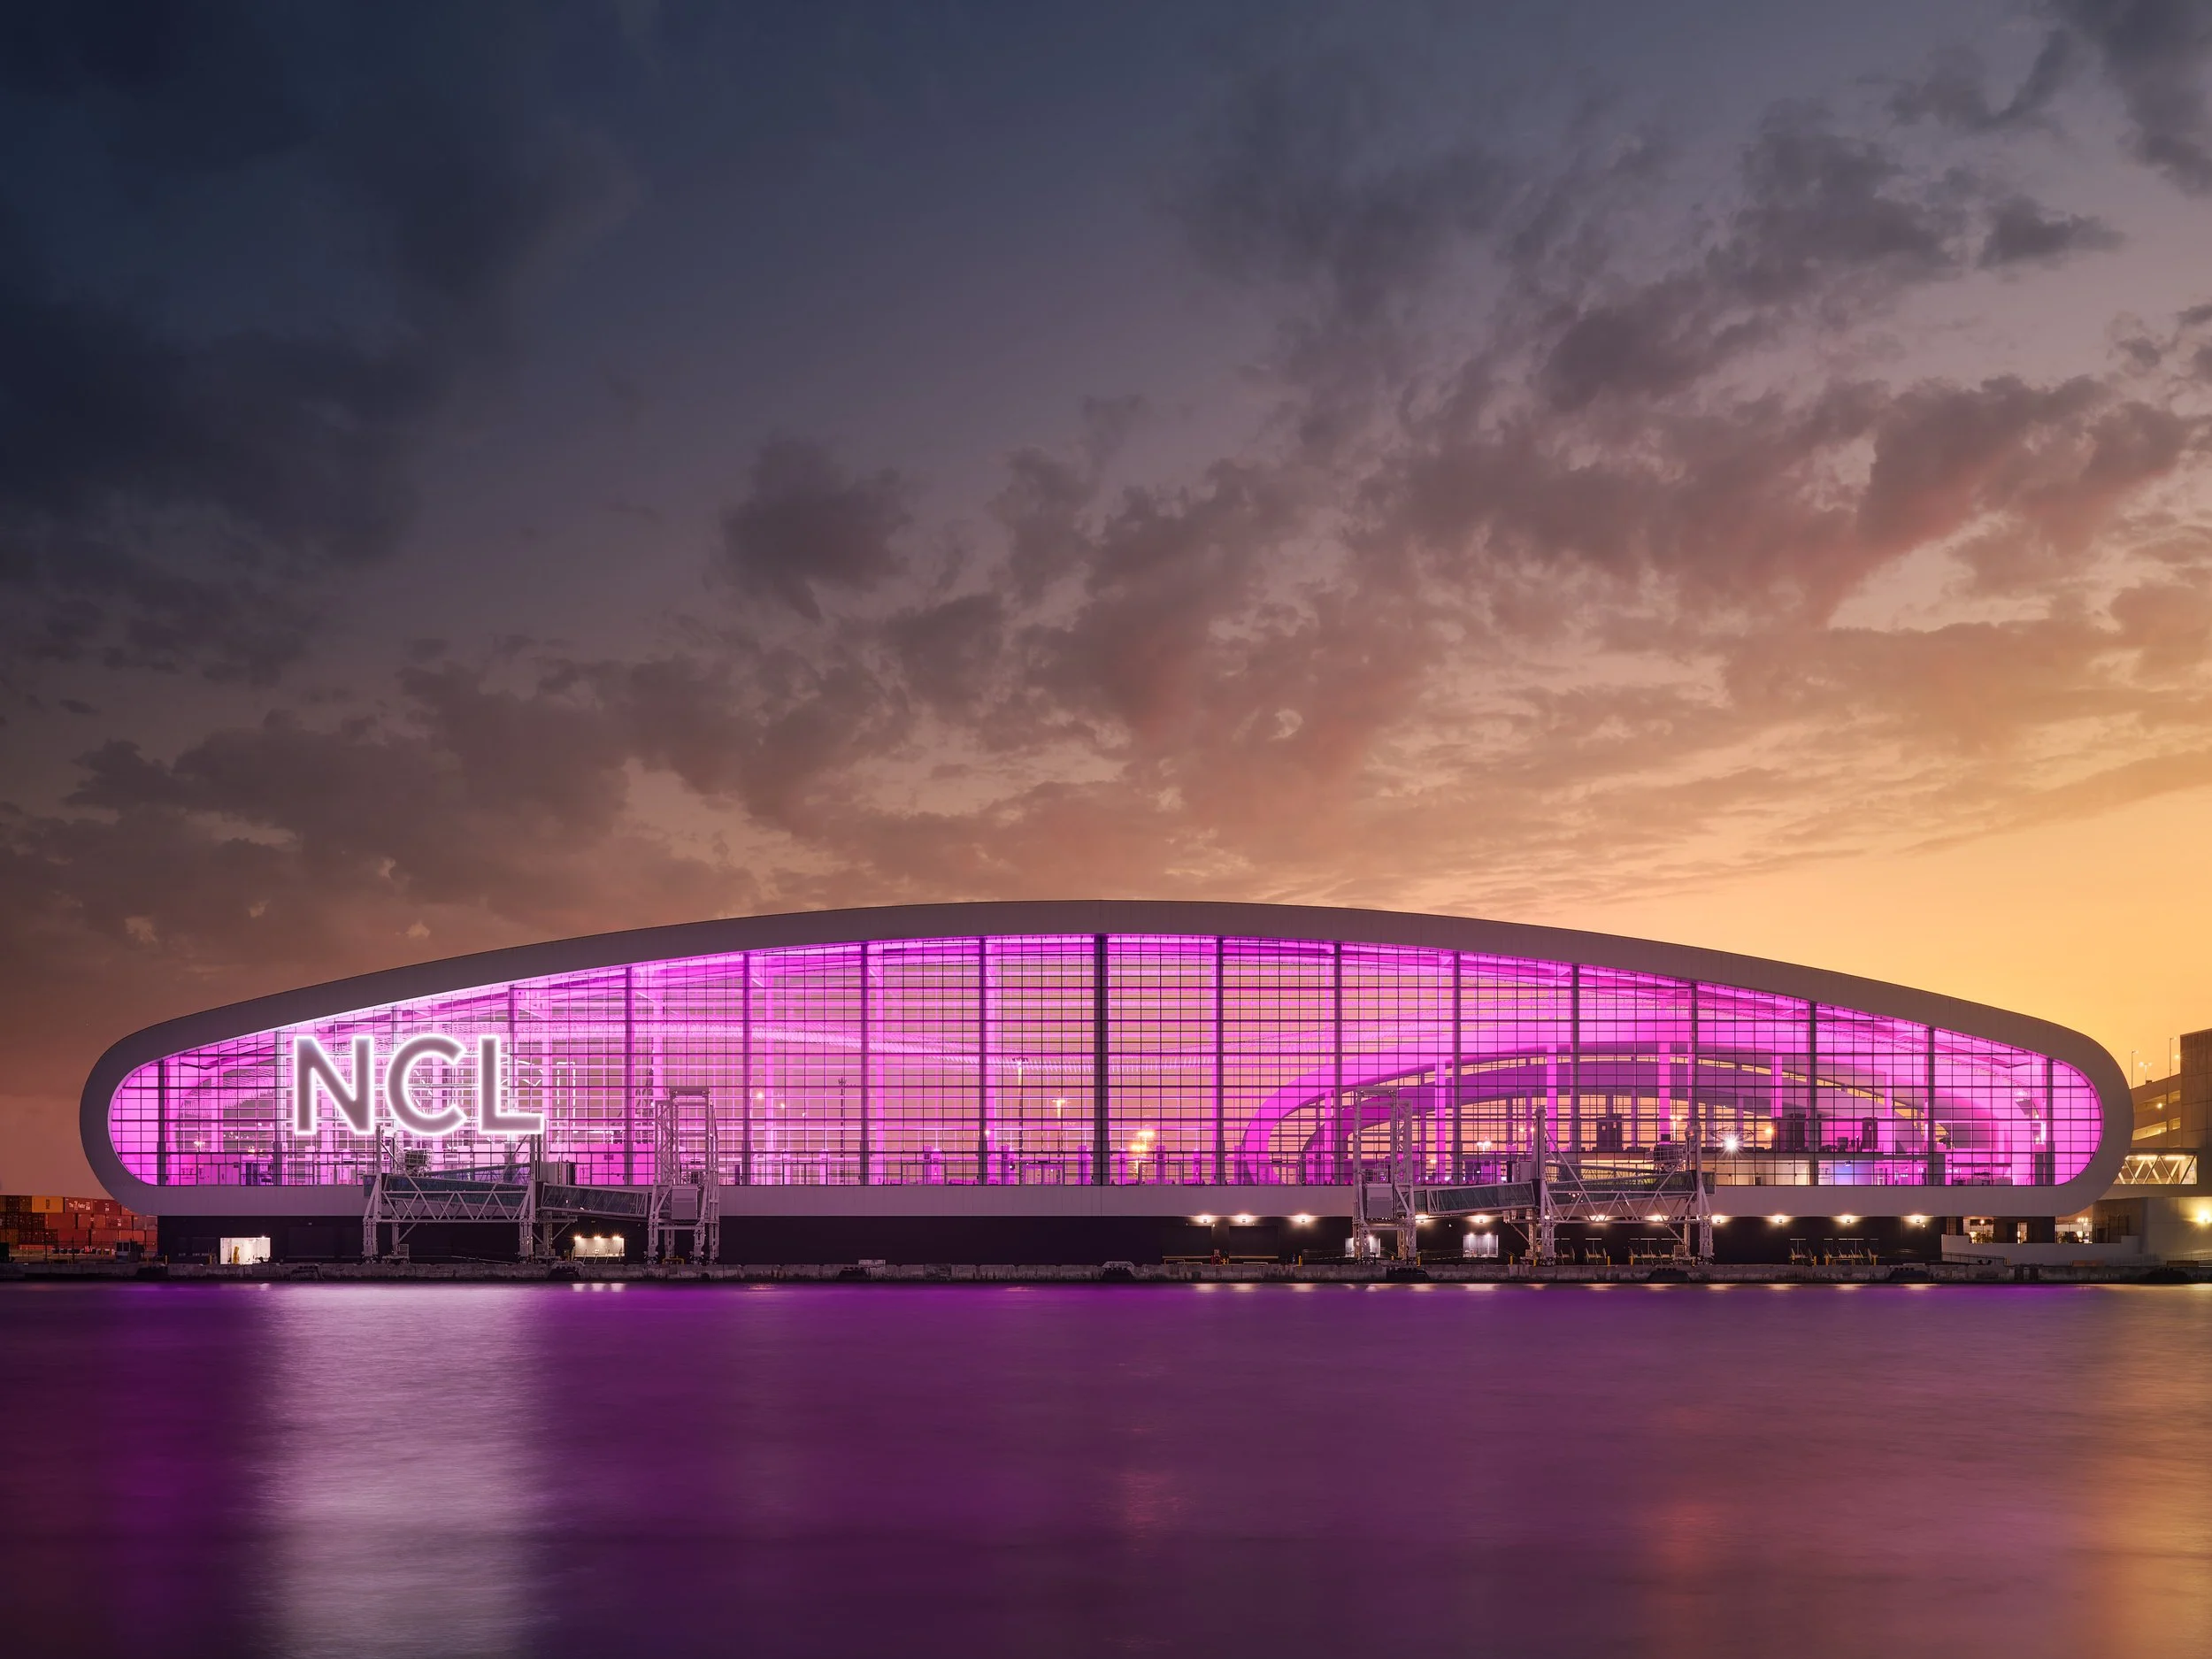
This architectural photograph of the NCL terminal in Miami required coordination with my client to access the DMX controls. I was positioned on the causeway across from the terminal and in communication via walkie-talkie to initiate the next theme of LED colors. This variant was the Breast Cancer Awareness theme.
Prepping For the Photoshoot
Verify all access points:
Whether you are shooting a hotel, a luxury condominium, or a private residence, obtain all necessary permissions in advance. The last thing you want is to show up and hit a wall because a GM or owner was not informed.
It happens—more than once.
I once arrived at 5 a.m. to capture sunrise from a penthouse balcony and was denied entry because my client had not cleared it with building management. The GM shut it down, partly because they were in a legal dispute with my client that still hasn’t been resolved, as indicated by the emails I am cc’d on.
Triple-check that everyone who needs to know is informed: dates, times, and the exact locations we will access.
High-traffic locations, such as restaurants, malls, or hotel lobbies, often require off-hours access to minimize disruptions to operations. I’ve shot my share of cruise ship restaurants at 2 am for this very reason.
If we are on public streets or someone else’s property for exterior work, confirm that permits or written permission have been obtained. Know the rules before we roll. I once shot billboards at Miami International Airport, and it took two weeks of back-and-forth with film offices to get approvals. I promise you that there is no “just showing up and winging it” for something like that.
It goes further: confirm parking, load-in, elevator access, and a secure staging room for gear. These details seem small until you burn precious light solving them on set.
Ensure Exclusive Access
I cannot tell you how many times I have been fully set up when landscapers, pool crews, maintenance, painters, or contractors show up and park themselves in the frame. It is almost always a communication miss. Person A approved our shoot, Person B never heard, and scheduled their own work.
Pick shoot days that belong to you exclusively. It is no fun for anyone when crews trip over each other trying to do their jobs.
Sometimes this is unavoidable. I get it. If you’re shooting a hotel that’s open or getting ready to open, they have a million other things to worry about and not enough time to worry about all of it. They won’t have much sympathy for your photoshoot if they’re worried about getting all the doors installed on time.
A quick legal note: if you plan to run paid advertising, you may need a property release. Ask your lawyer.
Know where Everything Is
Last year, I photographed a new university building with a whole glass façade. The plan was to capture sunset colors reflecting across the skin like a painting. That required every light in the building to be turned off and every shade to be raised. Six floors. Dozens of rooms. If we had waited until sunset to sprint door to door flipping switches, we would have missed the shot. Exactly.
Instead, I coordinated with the project engineer. We found the master panel that controlled the lights and shades. It was nowhere a visitor would find on their own.
The same idea applies when I shot a cruise terminal with RGB exterior lighting. I was on a radio with my client a mile away, calling cues while they ran the DMX controller. We captured each color theme on command.
Whether you are shooting a high-rise or a cabin in the woods, you need knowledge and access. Lights, shades, pool and garden accents, gate and garage motors, HVAC, and even the aquarium. If you are shooting video with sound, no one wants to hear the AC roaring. Learn how to turn it off ahead of time.
Twilight is a short window. We cannot waste it fumbling with remotes and wall plates. If something in the space must be operated, learn how to manage it. If there are alarm codes, learn them. If we need elevator keys or fobs, secure them. If it is a new build or a restoration, confirm there is running water. You do not want to learn otherwise when you need a bathroom.
Preparing The Space:
Deep clean every room. Make the beds. You don’t want to arrive to shoot a hotel room and then spend twenty minutes looking for a steamer. Tidy surfaces. Organize furniture—Mount art and accessories. Lay out the props you plan to use.
Remove stickers, construction tape, blue film, and price tags.
Replace burnt bulbs and ensure a consistent color temperature across all fixtures.
Hide cords, routers, cables, power bricks, remotes, and chargers.
Clean glass inside and out. Level the shades and blinds evenly.
Make sure landscaping is dialed. Keep driveways and walkways clear.
Furniture & Styling
Finalize layouts 24 hours before the shoot. Use the scout to learn what works and visualize the design for the shoot. I always joke with my clients that moving furniture is 30% of the job, and that’s not an exaggeration because what looks good in person can look awkward or distorted on camera. It is not uncommon to find your frame and then spend an additional 15-30 minutes tweaking all the furniture in the room. It can really be a game of inches.
Less is more. Remove anything that clutters sight lines. Many spaces in hotels, cruise ships, and museums are designed to hold hundreds of people, but that is never the most appealing variable of a design. Too much furniture easily overwhelms the frame, so I am vigilant at axing superfluous chairs and tables.
Choose florals and greenery that fit the brand and tone, but don’t force it just because you feel it “needs something.” Design that is influenced or inspired by a particular region looks great when complemented by appropriate fauna. Shooting Mid-Century Modern in Palm Springs? Then let the succulents shine! An industrial loft in the city? Can’t go wrong with Monstera deliciosa (a personal favorite). Download my free comprehensive styling guide here.
Coordinate props with your photographer and secure them in advance.
Think in simple, timeless pieces: a photo book, a plant, a bowl of fruit, or a folded throw.
Match the space: a few toys in a child’s room, a sun hat and pitcher in a beachfront home, not all at once.

Would this shot be nearly as impactful if it were void of humanity? Would an empty space have captured the essence of what the architects aimed for?
Human Elements
I am a big fan of people and architectural photography. It gives spaces a heartbeat. Architecture is made for people, and showing them how to use the space can have a considerable impact.
When shooting in public spaces, such as a skate park or plaza, we can capture people naturally and authentically. I often shoot with motion blur in mind, so figures aren’t recognizable as the primary focus. They add scale and energy.
If any frames require clearly identifiable people, we may need signed releases. That protects you and your partners.
Therefore, consider curating the talent for the shoot. Many clients use folks from their office. Bring a change of clothes and take turns “modeling.” No pressure. We are usually wide, with natural movement, subtle blur, or backs turned. Suppose faces are clearly identifiable, such as in my photos from the Glassdoor offices in San Francisco. In that case, it is much easier to secure releases from your own employees and partners.
Consider a wardrobe that complements the aesthetic and brand in the space. Tech office? Business casual. Summer home on a lake? Clean, relaxed, J.Crew-adjacent. If you want a specific look, talk to your photographer. Options include tapping friends and family, a quick casting call, or booking through an agency. Costs and logistics vary, so factor them into the plan.
Wardrobe and styling for talent
Avoid loud logos, neon colors, and busy patterns.
Choose solids or subtle textures that complement the palette.
The footwear is clean and suitable for the space.
Layers add shape without stealing focus.
Props that belong: laptop, coffee mug, sketchbook, tablet.
Hair/makeup should be natural and low-shine; powder can be applied to the forehead if needed.

Shots like these would require proper release forms from the subjects in the frame, as their likeness is clearly identifiable and a significant focus of the frame. Thankfully, they were my clients, so permission was inherent.
Food… For Thought
Remember to feed the team.
Coordinate with your photographer on the schedule for meal times. Who handles it depends on the job. Some days I order lunch. Sometimes my assistant does. Other times, the client or a coordinator takes it. This is more common on larger shoots, where my clients or the production company have the resources to delegate it, allowing the crew to focus on shooting. The point is to assign it early.
Shoot days are long. We are on our feet for hours. At a minimum, have plenty of water and coffee for those who want it. Snacks help keep energy steady. Do not wait until people are cranky to figure out what to eat. Most shoots are near good restaurants. Some are not. If the nearest option is 30 minutes away, plan to avoid last-minute stress.
And always remember to ask about potential food allergies and dietary restrictions. They’re more common than ever these days. Ask me about my delirious experience with macarons if we ever have some downtime on set.
Weather Plans:
The best-laid plans of mice and men oft go awry,” and nine times out of ten, weather is the culprit, especially in South Florida. Southern California friends, you are spoiled. Snow markets, lean into the mood. I envy those winter wonderland portfolios.
Rescheduling for rain can feel Sisyphean. It is part of architectural photography and nobody’s fault. Still, you should plan for contingencies.
Consider holding an extra date with your photographer in case of bad weather, either for rescheduling or a quick pickup window. I build schedules around local patterns. If storms occur in the afternoon, we front-load exterior work in the morning when the sun angle cooperates. Twilight often survives light rain and sometimes looks better, and skies can be replaced.
Do not get paralyzed by forecasts. Apps miss the mark more than you think. In South Florida, you should assume the forecast is always “rain” or “more rain” or “hah just kidding, turns out the sun’s out” but you won’t know til the day of, and now it’s too late. I tell my clients that if they’re waiting for the forecast to be favorable, they might as well wait until November to schedule anything.
This week, I had three shoots punted for “bad” outlooks, and we haven’t seen a drop of rain. Use local judgment. Unless the forecast is truly dire, I usually advise we try. In Florida, it may rain for an hour and the sun returns as if it never left. If I know it’s going to rain for an hour or so in the afternoon, I’ll aim to knock out any interiors that aren’t dependent on natural light, or those where we can take our time recreating them.
If I push to roll the dice and I am wrong, I will make room to pick up what we missed. If conditions are hazardous, safety wins.
This whole section is a long way of saying: use common sense and have a plan B.
The Shoot Day
We made it! All the planning, double-checking, and, yes, a little fear-mongering, brought us here so we can power through the shot list, build momentum, and get in the zone.
We will conduct a quick walkthrough to confirm the game plan and make any necessary last-minute adjustments. Then we proceed.
We will review compositions and lighting previews, adjust staging, furniture, and props as needed, and select variations when necessary. French doors open or closed. Bar stools tucked or turned.
Honestly, this part can speak for itself. At this point, the job is to stick to the plan and be ready to pivot. The more we plan, the more positive those pivots become. I once had a flock of peacocks land on a Mediterranean Revival balcony because a neighbor’s dog terrorized them around the block. It became the shot of the day.
The best advice here is simple: let your photographer cook. You have invested money, time, and trust. Do not derail the plan with unprompted significant changes.
Remember, the previews you see are unedited proofs. Many frames are built from multiple exposures. One for reflections. One with a pop of flash to shape a detail. One for ambient. The final image is the result of the blend, combined with the photographer’s style decisions, including contrast, direction of light, and color balance.
Be present and give focused feedback on what is in the frame. Time is scarce even on long summer days. Stick to the plan and keep moving. Have fun. Embrace a little chaos. If the dog will sit for a portrait, we try it. Then we get back on schedule.
Be excited for the final results.
After the shoot.
Oh, you thought we were done? That’s cute.
Yes, the on-site work is complete, and you can return to building the next project. Meanwhile, your photographer will spend the next week or two editing the files to perfection.
Here is what you can expect:
Some photographers stick strictly to the shot list. If you planned and budgeted for 20 images, you will receive 20 finished files.
Others work a little differently. I do stick to the list, and my estimate shows a ballpark range, but I am often inspired on set. I keep a second camera body handy for alternates and fire-from-the-hip moments. I will usually send a curated proof gallery so you can select what gets edited. Many clients budget for 20 and then decide to add 5 or 6 more. Either approach is acceptable; your photographer should establish these expectations up front.
Once selections are made and edits are complete, you will receive an updated gallery for review. This is the moment to provide focused notes on tone, exposure, mood, minor adjustments, and any other specific changes.
Most photographers include one or two rounds of revisions. Beyond that, expect added fees. To avoid scope creep, collect feedback from everyone upfront and route it through your designated decision-maker. Otherwise, you get the classic scenario: one person gives notes on Monday, revisions land on Wednesday, and a partner who never saw the proofs chimes in on Friday with a fresh set of changes. Set a simple 72-hour feedback window and stick to it.
After approval, you are in the home stretch. Your photographer will export files in the formats, resolutions, and crops that match your intended usage and deliver them. At that point, any outstanding balance is due.
And that concludes our architectural photography guide.
You made it to the end. Stand up, stretch, and take a sip of water. Then, congratulate yourself for surviving a post longer than a punch list. Your reward is fewer surprises, fewer headaches, and better pictures. Bookmark this for the next project, stop treating your budget like it’s KFC’s secret recipe herbs and spices, and let the shoot be part of the design, not an afterthought.
And if you need help documenting any upcoming projects, my emails are always open—shameless plug.